Source photos · 6 min read
Best Photos for AI Real Estate Videos: What Works and What to Avoid
An AI video scene is only as good as the photo it starts from. The camera move reveals things a still hides: soft focus, noisy shadows, a mirror that should show the room behind the lens. This guide explains which photos tend to make clean scenes, which details raise the risk of a scene that looks wrong, and how Vellivo's Studio checks each photo before any credits are used. It is about choosing between photos you already have, not about preparing a home for a shoot.
What the photo check looks at before you film
When you upload a photo to Vellivo Studio, it is checked before the Film button can spend anything. The check reads the file itself for format and pixel size, and an automated visual review looks at the image for problems that tend to break in motion. The result is one of three labels: Good source, Use with caution, or Replace photo.
Replace photo blocks the paid scene: no credits are reserved, and you are asked to pick a better image. Use with caution lets you continue only after you tick a box confirming you understand the listed risks; the normal mode price applies if a scene is delivered. If the automatic review is unavailable, the photo is treated as caution, never as a pass.
- Blocked: unreadable files, photos under 480 pixels on the shortest side, images that are not of a property, collages, screenshots or floor-plan graphics, severe blur, and photos far too dark or too bright
- Caution: slight softness, uneven exposure, mirrors or strong reflections, thin objects close to the lens, strong wide-angle distortion, flat head-on views, people or pets, overlaid text or watermarks, and very busy scenes
Sharpness: the first thing motion exposes
A slightly soft photo can look fine as a thumbnail and still produce a scene where edges shimmer or textures swim as the camera moves. Motion multiplies whatever is already in the image, including blur from a handheld shot in low light or heavy noise reduction.
If you have two photos of the same room, choose the sharper one even if the framing is a little less flattering. Zoom in to 100% on window frames, tile lines and the edges of furniture: crisp, straight edges are a good sign.
Resolution: the photo versus the finished scene
The photo's pixel size and the scene's output resolution are different things. A Standard scene is 720p and 6 seconds; Cinematic and Premium scenes are 1080p. A photo below 480 pixels on its shortest side is blocked, and one below 720 pixels is flagged, because the scene would have to invent detail the photo does not contain.
Use the original export from the photographer or camera rather than a copy saved from a listing portal or messaging app, which is often resized and recompressed. The scene's orientation follows the photo: portrait photos become vertical scenes and landscape photos become widescreen scenes, so pick the orientation you plan to publish in.
Light and exposure
Even, natural light gives the cleanest motion. Very dark corners tend to fill with noise that flickers when it moves, and blown-out windows are flat white areas with nothing for the camera to travel through. A photo where both the room and the view outside are readable is usually the safer choice.
Bracketed or HDR-blended interiors are fine as long as they look natural. Heavy halos around windows or furniture can become more noticeable in motion.
Mirrors, glass and reflections
Reflections are hard for any photo-to-video model. When the camera moves, a mirror should show a different part of the room, and glossy floors or large glazed doors should shift their reflections too. The model has to guess, and guesses in reflections are where viewers spot that something is off.
You do not need to avoid every glass door. If a room has a large wall mirror or a glass shower screen in the foreground, try an angle where it sits to the side rather than in the centre of the frame.
Thin objects close to the lens
Chair legs, plant leaves, lamp stands and railings near the camera move the most during a camera move, and thin shapes are the easiest to warp. The same objects further back in the room are much less of a risk.
If a plant or a chair back fills a corner of the frame, a slightly different angle of the same room often avoids the problem. Clearing fragile foreground items before a reshoot helps too.
Depth: more travel, more risk
Depth is what makes a scene feel like a camera moving through a space: a doorway leading into a room, furniture in front of a wall, a terrace railing with a view behind it. A flat, head-on photo of a wall gives the camera very little to work with, so the scene may move less.
Depth is a trade-off rather than a rule. The more layers a photo has, the more convincing the movement can be, and the more places there are for something to shift. Strong wide-angle distortion, where vertical lines bend at the edges, is flagged because those lines tend to drift as the camera moves. A photo with straight verticals and a clear foreground, middle and background is usually the best balance.
Three sample photos and what to notice
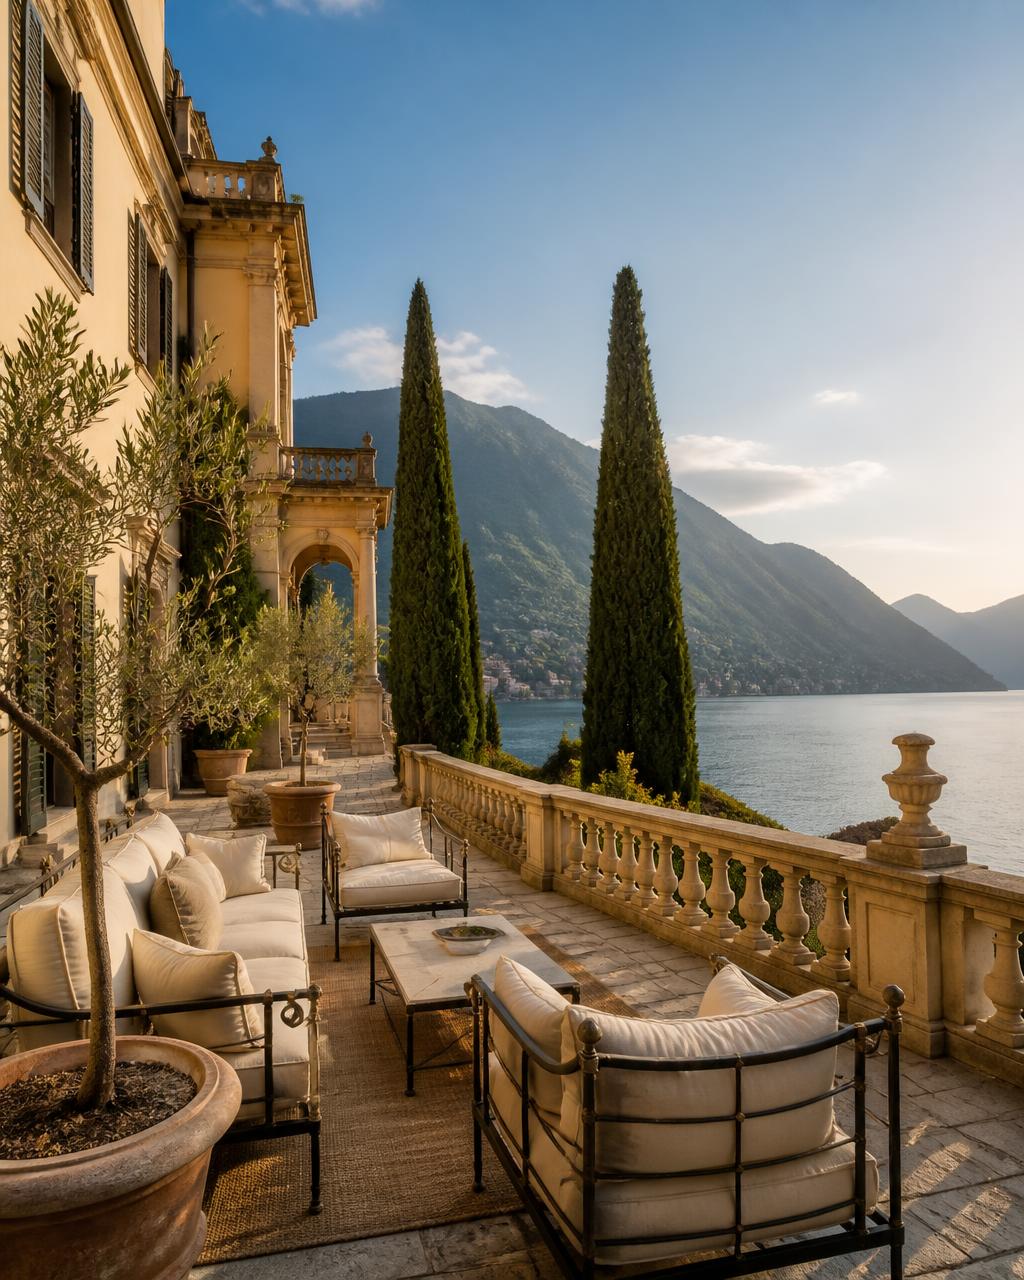
The examples below are AI-generated sample photos, not real listings, each shown with the clip Vellivo generated from that exact image in Cinematic mode. All three clips passed Vellivo's automated comparison with their source photo. We do not publish their scores, and a similar photo of your own is not guaranteed the same result.
The terrace has a deep view with a stone balustrade and potted trees near the camera, a mix of strong depth and thin foreground detail. The hallway has palm leaves close to the lens and glazed balcony doors, the kind of features the check flags for caution. The bedroom has a wall mirror and a hanging light, but the camera sits back from both and the verticals are straight.
Photo to video, side by side
Sample photos and the clips made from them
Drag each slider to compare the AI-generated sample photo with the Cinematic clip Vellivo generated from it. Demos only, not customer results.
Cinematic mode · 8-second clip

Cinematic mode · 8-second clip

Cinematic mode · 8-second clip
A Standard scene — the default for a first video — is 7 credits for 6 seconds in HD. Every paid scene is checked against its own source photo before it is delivered.
What happens after you press Film
Filming only starts when you press Film. Credits for the chosen mode are reserved at that point, and the finished scene is compared with its source photo for changes to the architecture, furniture and layout, frozen or static motion and visible artefacts. Weak attempts are regenerated automatically within a limited number of tries.
A scene that passes is delivered and charged once at the normal mode price. A small band of results that fall just short of the usual quality bar, but pass every structural and safety check, can also be delivered as a normal scene at the same price. Anything else is not delivered: the reserved credits are returned automatically and failed attempts are never shown. Always review a delivered scene against the original photo before you publish it.
Checklist before you upload
Run through this list for each photo you are considering. If two photos of the same room are close, the one with more ticks is usually the better source.
- The original, full-size file, not a screenshot or a portal download
- At least 720 pixels on the shortest side
- Sharp at 100% zoom on edges, frames and tile lines
- Room and windows both readable, with no crushed shadows
- No large mirror or glass screen in the centre of the frame
- No thin legs, leaves or railings right in front of the lens
- Visible depth, with straight verticals at the edges
- No people, pets, text, logos or watermarks
- Shot in the orientation you plan to publish in
- A photo you have the right to use and publish